Holiday Home Series: The Family Tree~A New Tradition


Welcome back to The Holiday Home Series.


 This year I am starting a new family tradition.  It's very simple but to me, very special.

We have two full sized Christmas trees at our house. "The Real Tree" and "The Special Tree".  "The Real Tree" is in the lower level Family Room.  It's a large tree loaded with all the kids' ornaments, multi-colored lights, and crazy loud train underneath.  The Special Tree sits in the Living Room.  It's a tall slim tree that displays a cherished collection of Hallmark ornaments given to me each year by my Dad until he passed away three years ago.

The Special Tree... 


This year, I am starting a new tradition with The Special Tree.  Nothing was more important to Dad than family.  It made him so happy when everyone gathered together.  To honor him and his love for our family I came up with a very simple way to incorporate the entire family into The Special Tree.


Using craft glue, I wrote the name of each family member on a red bulb. Then I sprinkled it with silver glitter while the glue was still wet.


I used regular silver glitter from the art supply store.


Each ornament was tied with a large wire ribbon bow.  


As our family visits our home during the holiday season, they will place their ornament on The Special Tree.


Those family members that are no longer with us, have already been placed on the top of the tree. 


Until everyone has been here, their ornament will wait for them, here,


doubling as a cute table accessory.


The Special Tree also waits,


to be completely filled 


with every last ornament.  


There's always room for one more, right?


For secret tips on how to decorate your Christmas Tree like a pro, click here. 


Does your family have a special tradition? 
To view the entire Holiday Home Series, please click here.
For information on my affordable online design services, please click here.

Merry Christmas,

Holiday Home Series: {Tips} Decorate Your Tree Like a Pro

Welcome back to The Holiday Home Series at The Yellow Cape Cod.  There are no rules when it comes to holiday decorating.  It's all about your traditions and what gives your family the warm and fuzzies.  


With that being said, sometimes the warm and fuzzies come from the beautiful, professionally decorated trees at Macys.  Being a third generation Holiday Decorator, my Mother and Grandmother have taught me some tricks of the trade. Today, I would like to share a few secrets on how to achieve the look of a professionally decorated tree at home.


Beginning with the most basic Christmas tree element, Bulbs.
Using lots and lots of bulbs in the same color unifies a tree with an eclectic mix of ornaments.


Bulbs in the same color with variations in texture give the tree interest. 


Shiny, glittery, flocked, matte finished bulbs all look amazing together and keep the tree from looking flat. 


Lights.
Weaving your lights over and under each branch, and from the base of the branches to the tips will illuminate the tree from the inside out.  It will provide amazing back light for your ornaments and give the tree a twinkling light effect.   


Graphic elements.
Adding a large graphic design element (like these snowflakes from The Dollar Tree) will draw attention to the tree.  It will also help space the other ornaments evenly by creating "compartments". 


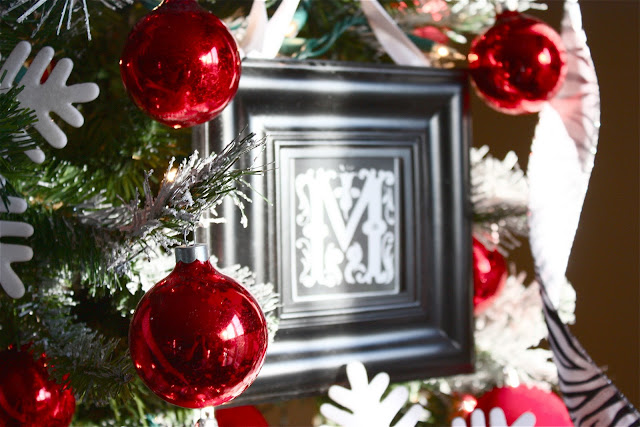
Adding unusual elements to the tree will give it a more "showcased" look.  Like the trees you see in the retail stores.  I made these monogrammed ornaments with frames from The Dollar Tree and free internet clip art. 


Ornament nooks.
Take advantage of bare spots or openings in the branches to create little nooks for showcasing ornaments that are special.  


Balance.
To create a perfectly balanced tree,  place small bulbs on the top branches, 


medium sized bulbs in the middle, 


and large at the bottom. 


Depth.
Hanging ornaments deep inside the branches creates depth.  Depth is the key ingredient to a professional looking tree.  


Ribbon. 
For perfect ribbon curls, let the ribbon fall naturally from the spool.  Then loosely hang the ribbon vertically from the top of the tree.  The less the ribbon curls are manipulated, the better they look.


The last tip I would like to share is very important.  If you find yourself getting frustrated, stop.  Take a step back and sip a spiked eggnog.


Enjoy the process and you will enjoy the result so much more.


Thanks for stopping by.
To view the entire Holiday Home Series, please click here.
For information on my affordable design services, please click here.
 I am now accepting new online design projects!


Holiday Home Series: Our Christmas Mantle 2011 {Tutorial}


Today, I finished up our 2011 Christmas mantle.
It began with our stockings from Ballard Designs.


Yesterday's post was dedicated to the art of hanging stockings and how to get them to hang straight.
Please (click here) if you would like to read more.


The reindeer antlers were a summer garage sale find.  I gave them the glitter treatment with Krylon gltter blast spray paint.  I've have been waiting 6 months to see them on our Christmas mantle.  That makes me sound kinda crazy, doesn't it?


If you would like to create your own glittered reindeer antlers, please click here for a simple tutorial.  


The greenery is a combination of fresh greens from the front yard and faux leaves from The Dollar Tree.  (Click here to see my post on using greens from your yard to decorate your home for free)


Here is how it came together:

1.  First, I gathered fresh greens from the front yard and wove them loosely around the antlers. 


(2 Authentic Reindeer Antlers ~my neighbors garage sale)


2.  I added faux leaves for interest and variation in texture.


(5 faux bay leaf sprays ~The Dollar Tree)


3.  Glittered red ornaments and faux berries added a bright pop of color. 


 (5 faux berries ~Walmart)


(Red Glittered Ornaments ~Sams Club)


4.  Using fishing line from my sons tackle box, I suspended 5 three dimensional snowflake ornaments over the display.  I used invisible packing tape to hang them from the ceiling.  You may wish to use removable command hooks to keep the tape from pulling up the ceiling paint :)


(5 3D Snowflake ornaments ~The Dollar Tree)


Thank you to Jennifer Perkins, the DIY Editor over at Blogher for featuring my 2011 Christmas Mantle over at Blogher.  Click here to check it :)  

To view the entire Holiday Home Series, please click here.
For information on my affordable online design services, please click here

Merry Christmas!


Related Posts Plugin for WordPress, Blogger...
 
SITE DESIGN BY DESIGNER BLOGS