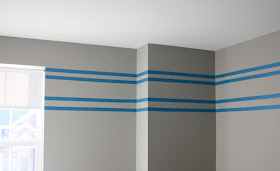
Today's project tutorial was a quick and easy paint technique that brought subtle graphic interest to a room I just wrapped up for a little boy, Jack.
For this project I used two paint colors, a base color (Dorian Gray, Sherwin Williams) and an accent color (Dovetail, Sherwin Williams). These colors are next to each other on the paint swatch card, the accent color being one shade darker than the base color.
First, I had the room painted with the base color. I allowed it to cure for 24 hours.
Then, using a measuring level and a piece of chalk I made small, evenly spaced, level guide marks around the entire perimeter of the room.
If you're going to tackle this project, I highly recommend purchasing a measuring level. It is a level and tape measure in one. It's one of my most used decorating tools.
I used the top of the window to determine the height of my first stripe. The measurement was 8 inches from the ceiling. I made small horizontal chalk marks 8 inches below the ceiling around the perimeter of the room.
***Helpful Tip: Painters tape is not perfectly straight. The further apart your guide marks are, the more likely the tape will start to curve. Making guide marks no more than 24 inches apart will keep your tape on track and produce nice straight lines.
After the first line of tape was in place, I continued making guide marks for the remaining stripes.
I measured 2 inches from the bottom of the first tape line to create a 2 inch top stripe.
I measured 6 inches from the bottom of the second row of tape to create a 6 inch middle stripe. For the bottom stripe, I measured 3 inches from the bottom of the third row of tape to create a 3 inch bottom stripe.
For perfectly crisp lines, I painted over the tape using the base paint color (Dorian Gray). This step sealed the tape preventing any seepage of the accent color. When the paint was dry to touch (about 2 hours later) I painted over the taped area with the accent color (Dovetail).

I removed the tape exposing sharp, straight, tone on tone stripes. After the paint cured for 24 hours, I removed the chalk guide marks with a damp cloth.
Using similar paint colors creates a tone on tone effect that provides subtle graphic interest. It was important that the stripe in this space didn't compete with another other dynamic element in the design. I can't wait to share the final room reveal next week.
Thanks for stopping by.
**For information on my on-line design service, please click here. For on-site design services (Detroit) please email TheYellowCapeCod@yahoo.com for pricing and availability.
© Copyright 2013 The Yellow Cape Cod


Looks fantastic with the shape of the walls.
ReplyDeleteHow cool the gray looks and the tips are perfect.
ReplyDeleteit looks really nice.
ReplyDeletenow, off to look for that measuring level.
Pinned!
ReplyDeleteHi there. Love your site! I just painted a stripe in my son's room this past weekend (using this tutorial) and had a lot of bleed through or "rough" edges. Any thoughts on what I did wrong? I drew level lines put down blue painters tape, pushed hard to seal it, painted over it first with the base color and then the accent color (stripe color needed two coats) pulled up tape when I was done. Obviously the tape wasn't sealed well in some places but not sure what I could have done to better seal it. My husband thought maybe using Frog tape? But looks like you used regular painters tape? Any suggestions would be great. And how to fix? Carefully with a small paint brush? Also what did you use to paint the corners where you can't roll? I used a foam brush but it's hard to match the look of the roller. Thanks!
ReplyDeleteHi Vanessa, Thanks for your feedback. I am at a loss as to how the bleeding occurred. Using the base coat to seal the tape should have prevented seapage from happening at all (not even a little bit). My advice is to paint over your stripe and give it another go. I used a regular soft bristle brush for the corners. Thanks again, for sharing.
DeleteBest, Sarah
Hi Vanessa. I know this thread is a couple of years old, but I am about to use it to do a stripe around my son's room. I have painted all of the rooms in my house, and I have found that if I pull the tape as soon as I am done (as it sounds like you did), I ALWAYS have rough edges and have to fix it afterwards. If I wait the minimum 24 hours before pulling the tape (as recommended in the tutorial) I get a nice crisp edge every time. If you did in fact pull the tape right away, as it sounds like you did, I would assume that was your issue. If not, I am not sure what would have caused the bleeding. Thanks, Cara.
DeleteThanks for responding - I really appreciate it!
ReplyDeleteVanessa