Recently, I announced my partnership with The Home Depot for the 2015 Do-It-Herself (DIH) Workshops Program. The first project I made with them this year was the DIH Paver Planter. This month, I made a DIH Serving Station and I couldn't be more excited about the way it turned out! Today, I'm going to take you through the steps I took to make this simple, fun, and handy project.
I will also be co-hosting a live demonstration of this project at 6:30pm this Thursday, June 18th at The Home Depot in Grand Rapids, Michigan (Store #2720 located at 2727 Alpine Ave NW Grand Rapids, Michigan). If you are not located in that area, no worries, you can go to your local Home Depot (same time and date) to attend your local DIH Workshop where they will be demonstrating this same project. Please Click Here To Register. During this FREE demonstration-style workshop, Home Depot professionals will show you the steps required to make a DIY Serving Station out of simple materials using easy to operate power tools. In addition to co-hosting a workshop here in Michigan, my job is also to share ideas with you on how to put your own twist on the project right here on the blog.
Let me take you through the steps I took to make my DIH Serving Station. I followed The Home Depot's "DIH Outdoor Serving Station Instructions". Then, I made a few tweaks to customize the look. I also decided to keep my Serving Station inside and use it in our formal dining room, as opposed to using it outside.
Before I get into the details on how I customized the project, lets take a look at The Home Depot's version.
The "DIH Outdoor Serving Station"...
The "DIH Outdoor Serving Station"...
Isn't it adorable? Are you ready to make one of your own?
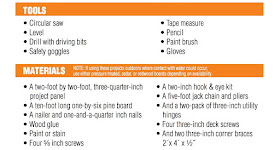
Here is what you will need...
Here are the steps...
Now, here are the tweaks I made to these instructions to put my own personal touch on the "DIH Outdoor Serving Station"...
As I mentioned, I decided to keep my serving station indoors as opposed to using it on our deck. Therefore, instead of staining it (as shown in step one) I painted mine black to complement my dining room decor. I used black chalkboard paint which allows me to write messages on the serving board or label whatever food I'm serving.
Another way I personalized the look was to use black hardware. I was able to find a black chain and black hook and eye kits at The Home Depot. I couldn't find black hinges in the size that I needed, so I purchased brass hinges and spray painted them black.
The last tweak I made was to hang the serving station using d-ring hangers instead of the corner hinges shown in step six. This made it easy for me to use dry wall anchors. It also made the mounting hardware less conspicuous.
Since making my serving station a week ago, I've already used it twice. Once as a coffee/dessert station (as shown) and once as a wine/cheese serving station. I labeled my cheese using chalk markers on the serving board surface.
There are so many ways this project could be customized to suite your style and/or needs. I'm in love with the way this piece looks in my dining room and it has been so useful. There is nothing more gratifying that building something yourself and loving with the results! If you've never attempted a DIY project, this is a great "first project" to try. Come on out to your local Home Depot DIH Workshop to catch a live demonstration and have an opportunity to learn how to use the tools required to make one for yourself.
Once again, the workshop featuring the DIH Outdoor Serving Station will be held this Thursday, June 18th at 6:30pm at most Home Depot locations. For more information and to pre-register for the workshop near you, please click here.
If you are in Michigan, you can find me at the Grand Rapids Store #2720 located at 2727 Alpine Ave NW Grand Rapids, Michigan on Thursday, June 18th. Hope to see you there!


So cute ,functional & your styling is always stunning!
ReplyDeletePaige.Rose
from
www.TheQuaintSanctuary.blogspot.com
Thank you Paige Rose!!
Delete