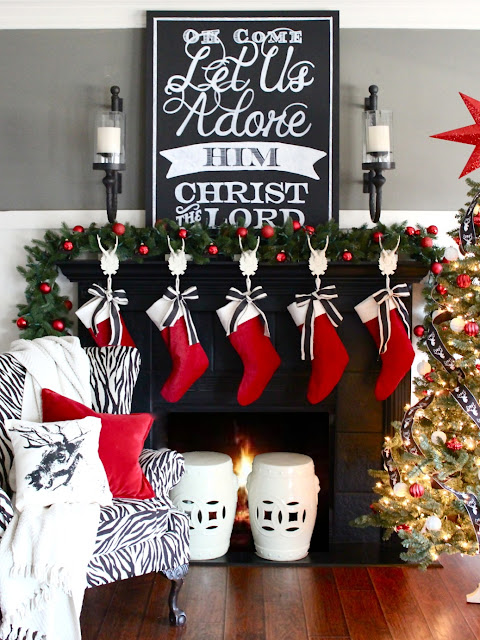
Thank you so much for all the kinds words on my holiday home tour! I'm overwhelmed and humbled by the amazing response both here on the blog and on social media over the past few days. I had a lot of fun decorating for my family this year. I can't wait to start sharing all of the tutorials and behind the scenes details for the projects I included in our holiday home decor this year. Starting today! This project tutorial is one of my favorite Holiday Decor projects ever; Extra Large DIY Christmas Carol Art. There are a few reasons why I love this project much. The first is that it's relatively simple (anyone can do this and achieve great results), second, it is extremely budget friendly (especially for the size of the piece) and third, because it is completely customizable. You can make this project in any color palette and size that you need to fit your space.
The total cost was less than $25. That's a reasonable budget for such a large piece of art, don't you think? The bold graphic quality of this sign over our mantle is an instant focal point in our living room. It features one of my families favorite Christmas carols so, not only do we appreciate the way it looks, but it has special meaning to us. Bonus!
Here is how I made it…
To start, I downloaded a free printable that I found online. Then, I went to my local office supply store and asked them to print it out on engineering paper. I asked them to blow it up and print it out as large as possible so I could use it as a template for an extra large art piece.
*The link to the printable I used for this project is no longer available to download. But there are many other options online if you search "free printables". Or, you could purchase one on a site like Etsy.
Here are the rest of the materials needed for this project:
1. A Sheet of 1/4 inch MDF, cut to the size you desire. (Your local lumber yard may make the cuts for you if you ask. Mine does!).
2. Latex Paint (I used flat black paint I already had in my stash)
3. One Sheet of Tracing Paper (also called Transfer Paper, available at craft stores).
4. 2-3 Oil Based Sharpie Paint Markers (These are available in many colors and thicknesses. I chose white and the thickest option available).
5. A pencil
6. Tape
7. Your Template From The Office Supply Store
The first step is to paint your MDF using the latex paint. Once it has dried, tape your template to the front of your MDF from the top. (Since my piece of wood was so large, I propped it up against the wall then worked on it from a sitting position on the floor).
Position your transfer paper in between your template and your MDF and lightly tape it in to place. Using your pencil, trace the outline of the image on your template onto the MDF. Since transfer paper is usually sold in small sheets, you will need to move it around as you work. One sheet of transfer paper will last quite a long time, so no worries that you will need more than one.
Once the image from your template is completely traced onto the MDF, you can begin to fill in the outlines using the oil based paint markers. My project required two coats of the paint marker to give it a nice even look. It took about 2 and a half paint markers to complete the project when it was all said and done. I allowed the paint to dry a few hours in between coats.
That's it!
If you make one of these, I would love to see it! Please feel free to post it to my Facebook page, Instagram feed or send me a pic at TheYellowCapeCod@yahoo.com. For more simple and affordable holiday project ideas, please click here.
Thanks for stopping by!
Online Design Services are now available. Please click here for details.


No comments:
Post a Comment